Implementation details
Details of implementation corresponding to modules used in the provided architectures, autoencoder construction, transfer learning or training details are provided in this section.
Deterministic algorithms
ClinicaDL allows to set the seed of the pseudo-random libraries used by the library (numpy, random,
and torch). This seed is also used in train data loaders, to avoid the randomness
in data loading introduced by Pytorch.
However, this is not sufficient to guarantee the exact reproducibility when using GPU (though the results will
be more close than with two different seeds). To obtain exactly the same results with the same GPU environment,
the user must specify the flag --deterministic. This will force CUDA to use a
deterministic behavior, but at the cost of the computation time, or the memory use.
Non-deterministic functions in Pytorch
Pytorch library is currently improving the reproducibility of their methods, however all the functions do not have a reproducible equivalent yet. If you want to be deterministic, you may need to adapt your architecture or wait until Pytorch implements the deterministic version of the function you need.
Adaptive padding in pooling layers
Pooling layers reduce the size of their input feature maps. There are no learnable parameters in this layer, the kernel outputting the maximum value of the part of the feature map its kernels is covering.
Here is a 2D example of the standard layer of pytorch nn.MaxPool2d:
The last column may not be used depending on the size of the kernel/input and stride value.
To avoid this, pooling layers with adaptive padding PadMaxPool3d were implemented in ClinicaDL to exploit information from the whole feature map.
Adapt the padding... or the input!
To avoid this problem, deep learners often choose to resize their input to have sizes equal to 2n with maxpooling layers of size and stride of 2.
Autoencoders construction from CNN architectures
In ClinicaDL, autoencoders can be derived from a CNN architecture. In this case:
- the encoder corresponds to the convolutional part of the CNN,
- the decoder is composed of the transposed version of the operations used in the encoder.
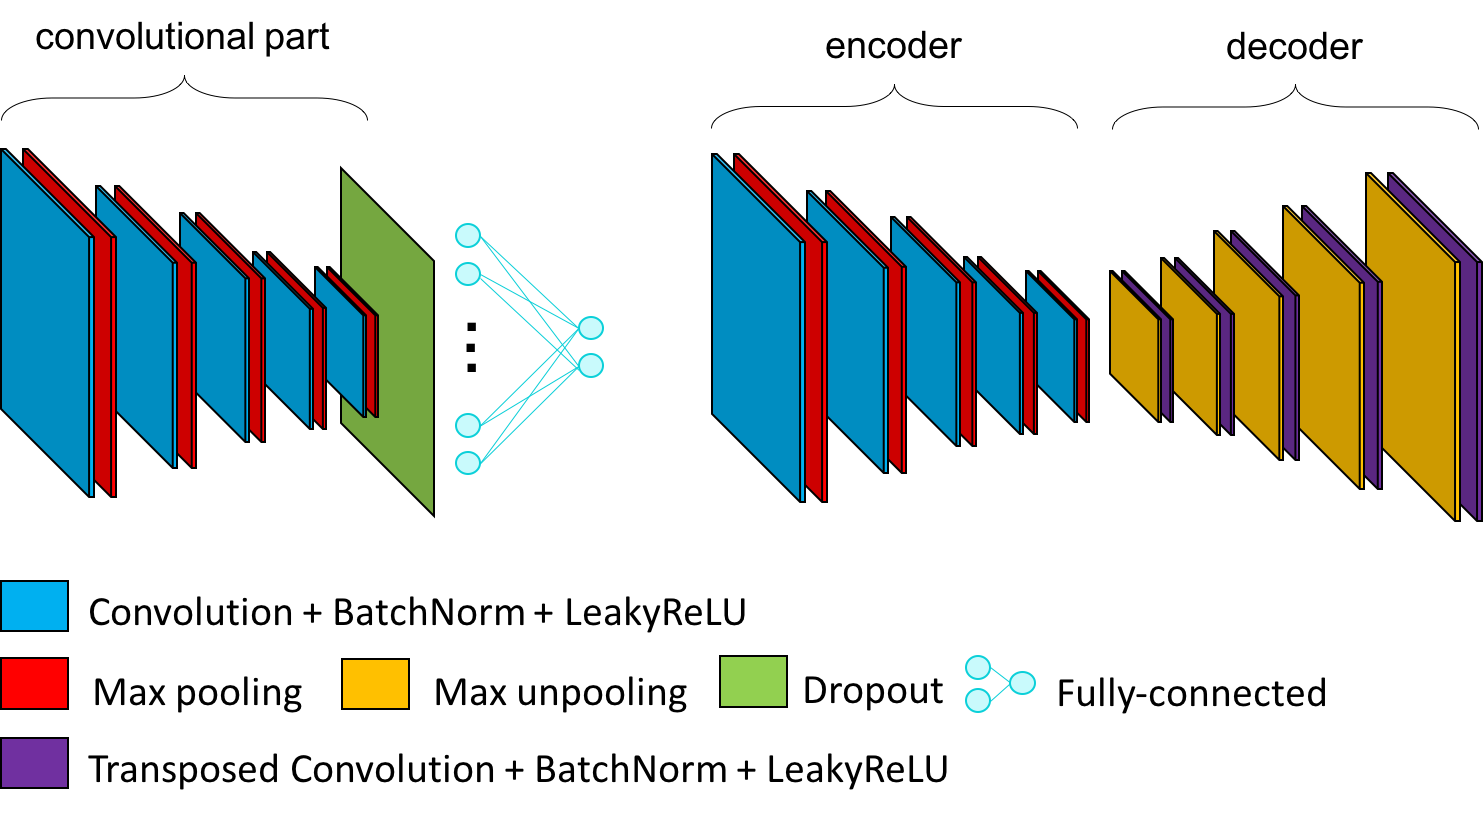
The list of the transposed version of the modules can be found below:
Conv3d→ConvTranspose3dPadMaxPool3d→CropMaxUnpool3d(specific module ofclinicadlused to reconstruct the feature map produced by pooling layers with adaptive padding)MaxPool3d→MaxUnpool3dLinear→Linearwith an inversion inin_featuresandout_features,Flatten→ReshapeLeakyReLU→LeakyReLUwith the inverse value of alpha,- other → copy of itself
To easily transform a custom CNN architecture (without skip connections) in an autoencoder, you can use the
CNN_Transformer class in clinicadl/utils/network/autoencoder/cnn_transformer.py.
Transfer learning
Model identity
Weights can be transferred between a source and a target network only if their layers are named
the same way (i.e. the models are identical). To ensure transfer learning between a CNN and an
Autoencoder, please use the CNN_transformer (see section above).
It is possible to transfer trainable parameters between models.
In the following list the weights are transferred from source task to target task:
AutoEncodertoCNN: The trainable parameters of the convolutional part of theCNN(convolutions and batch normalization layers) take the values of the trainable parameters of the encoder part of the source autoencoder.CNNtoAutoEncoder: The encoder takes the values of the convolutional part of theCNN.- between identical networks: All the trainable parameters are transferred between the two models.
singletomulti: The single network is used to initialize each network of the multi-network framework.multitomulti: Each network is initialized with the weights of the corresponding one in the source experiment.
Optimization
Since v 1.0.4 of ClinicaDL, it is possible to chose the optimizer in clinicadl train. We added all the main optimizer available in Pytorch:
* Adadelta,
* Adagrad,
* Adam,
* AdamW,
* Adamax,
* ASGD,
* NAdam,
* RAdam,
* RMSprop,
* SGD.
The default optimizer is Adam.
Usually, the optimizer updates the weights after one iteration, an iteration corresponding
to the processing of one batch of images.
In ClinicaDL, it is possible to accumulate the gradients with accumulation_steps during N iterations to update
the weights of the network every N iterations. This allows simulating a larger batch size
even though the computational resources are not powerful enough to allow it.
virtual_batch_size = batch_size * accumulation_steps
Evaluation
In some frameworks, the training loss may be approximated using the sum of the losses of the last batches of data seen by the network. In ClinicaDL, set (train or validation) performance is always evaluated on all the images of the set.
By default, during training the network performance on train and validation is evaluated at the end of each epoch.
It is possible to perform inner epoch evaluations by setting the value of evaluation_steps to the number of
weight updates before evaluation. Inner epoch evaluations allow better evaluating the progression of the network
during training.
Computation time
Setting evaluation_steps to a small value may considerably increase computation time.
Model selection
The selection of a model is associated to a metric evaluated on the validation set.
At the end of each epoch, if the validation performance of the current state is better than the best one ever seen, the current state of the model is saved in the corresponding best model folder. Such comparison and serialization is only performed at the end of an epoch, even though inner epoch evaluations are performed.
The command
clinicadl train list_models
--architecture(str) is the name of the network for which information will be displayed.--model_layers(flag) to display the detailed Pytorch architecture.--input_size(str) is an option to chose a different size of the input of the model with shape C@HxW if the image is 2D or C@DxHxW if the image is 3D. For example if the input size is 1@169x208x179, the option--input_size 1@169x208x179should be added.
Stopping criterion
By default, early stopping is enabled to save computation time. This method automatically stops training
if during patience epochs, the validation loss at the end of an epoch never became smaller than the best validation
loss ever seen * (1 - tolerance). Early stopping can be disabled by setting patience to 0.
If early stopping is disabled, or if its stopping criterion was never reached, training stops when the maximum number
of epochs epochs is reached.
Image-level results
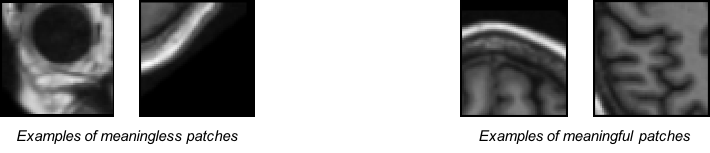
For classification or regression tasks that take as input a part of the MRI volume (patch, roi or slice), an ensemble operation is needed to obtain the label at the image level.
For classification task, soft-voting was implemented as all inputs are not equally meaningful. For example, patches that are in the corners of the image are mainly composed of background and skull and may be misleading, whereas patches within the brain may be more useful.
Then the image-level probability of label 1 p1 will be:
$$ p^{1} = {\sum_{i=0}^{35} bacc_i * p_i^{1}}$$
where:
- pi1 is the probability of label 1 for patch i,
- bacci is the validation balanced accuracy for patch i.
For the regression task, hard-voting is used, then the value of the output at the image level is simply the average of the values of all image parts.
Multi-network
By default, all images are used as input of a unique network. With the --multi flag,
a network is trained per image part.
The flag --multi cannot be used if the number of parts per image is 1 (for example in image mode
or in roi mode if there is only one region).
Multi-cohort
Starting from version 0.2.1, it is possible to use ClinicaDL's functions on several datasets at the same time.
In this case, the multi-cohort flag must be given, and the CAPS_DIRECTORY and the TSV_DIRECTORY
correspond to TSV files.
The CAPS_DIRECTORY argument must lead to a TSV file with two columns:
cohortthe name of the cohort (must correspond to the values inTSV_DIRECTORY),paththe path to the corresponding CAPS hierarchy.
The TSV_DIRECTORY argument points to a TSV file with two columns:
cohortthe name of the cohort (must correspond to the values inCAPS_DIRECTORY),paththe path to the corresponding labels list, outputs ofsplitorkfoldmethods.diagnosesthe diagnoses that will be used in the cohort. Must correspond to a single string with labels separated by commas.
Distributed Data Parallelism
It is possible to train a model with ClinicaDL using Distributed Data Parallelism (DDP). DDP uses multiple GPUs to speed up the training process. DDP splits a batch across GPUs so that the memory requirement and workload per GPU is lower.
ClinicaDL's cluster module detects when your script is launched within a distributed environment and sets up the distribution by itself. However, you will still need to launch your code as many times as you have GPUs. You may want to use use a launcher for that. Currently ClinicaDL's cluster module supports SLURM (srun) and TorchElastic (torchrun). Additional launcher might be included in the future.
Distributing the training process allows the usage of Zero Redundancy Optimizer.
You will decrease the memory footprint per gpu of the optimizer states.
However Pytorch's implementation might increase the volume of communications.
Use the --fully_sharded_data_parallel or -fsdp flag to activate this feature. This currently only implements ZeRO
Stage 1 but will be entirely replaced by FSDP in a later patch.